
Integrating a Custom Widget into Qt Designer
This blog post will describe how to write a custom Qt widget and how to integrate it into Qt Designer so that you can drag and drop it onto your designs. It will also provide an understanding of important differences between Qt 4 and Qt 5 when it comes to creating designable widgets.
The example we will work through is an LED (Light Emitting Diode) object. It is designed to be a realistic representation of the real thing:

The diameter of the LED is measured in millimeters (like real LEDs) and can be any color you want (unlike real LEDs). The on/off state can be changed programmatically and it can be set to flash at a specified rate in milliseconds.
Qt Designer uses a plug-in architecture so we need to build a shared library (on Linux, UNIX and MacOS) or a DLL (Windows).
We'll start by looking at portions of the header for the LED.
 4  #include <QtDesigner/QtDesigner>
 5  #include <QWidget>
 6
 7  class QTimer;
 8
 9  class QDESIGNER_WIDGET_EXPORT LED : public QWidget
10 {
11   Q_OBJECT
12
13   Q_PROPERTY(double diameter READ diameter WRITE setDiameter) // mm
14   Q_PROPERTY(QColor color READ color WRITE setColor)
15   Q_PROPERTY(Qt::Alignment alignment READ alignment WRITE setAlignment)
16   Q_PROPERTY(bool state READ state WRITE setState)
17   Q_PROPERTY(bool flashing READ isFlashing WRITE setFlashing)
18   Q_PROPERTY(int flashRate READ flashRate WRITE setFlashRate)
On line 4, we include the Qt Designer header file. This pulls in everything needed to make the widget designable. On line 9, we declare the LED class. It inherits from QWidget. The QDESIGNER_WIDGET_EXPORT macro inserts OS-specific code that ensures the LED class will be exported in the shared library or DLL properly. On some platforms, it evaluates to empty. LED is a QObject that defines properties and slots so we need the Q_OBJECT macro (line 11).
Properties are an important feature of the Qt meta-object system. A property is a value that can be read and (optionally) written. More importantly for our purposes, properties are exposed in the Qt Designer property editor. Lines 13 to 18 specify six properties of the LED widget. Q_PROPERTY is a C++ macro that evaluates to nothing in the C++ code that is output by the C++ pre-processor. Q_PROPERTY is for the benefit of the Qt meta-object compiler (moc). Moc recognizes Q_PROPERTY and parses its parameters; the C++ pre-processor never sees it. The first parameter is the data type and the second is the property name. For each property, we define "setter" and "getter" methods using the WRITE and READ parameters (leaving out the WRITE parameter makes the property read-only). Additional parameters are described in the Qt documentation.
Lines 24 to 45 define the property reader and writer methods:
24   double diameter() const;
25   void setDiameter(double diameter);
26
27   QColor color() const;
28   void setColor(const QColor& color);
29
30   Qt::Alignment alignment() const;
31   void setAlignment(Qt::Alignment alignment);
32
33   bool state() const;
34
35   bool isFlashing() const;
36
37   int flashRate() const;
38
39 public slots:
40   void setState(bool state);
41   void toggleState();
42   void setFlashing(bool flashing);
43   void setFlashRate(int rate);
44   void startFlashing();
45   void stopFlashing();
Notice that setState, setFlashing, and setFlashRate are marked as slots (lines 40, 42, and 43). This allows a programmer to connect signals from other widgets to the LED slots to control it. The other slots are variations on the setState and setFlashing setters.
It is important for a widget to behave properly when managed by one of Qt's layout managers in terms of size and location. The virtual method sizeHint (line 49 below) should be overridden by your custom widget to give Qt's layout objects a clue about how to size the widget. The heightForWidth method (line 48) returns the preferred height for the widget given the width. The minimumSizeHint method returns the recommended minimum size for your widget.
47 public:
48   int heightForWidth(int width) const;
49   QSize sizeHint() const;
50   QSize minimumSizeHint() const;
Probably the most important method is paintEvent (line 53):
52 protected:
53   void paintEvent(QPaintEvent* event);
This is where all the painting happens whenever the widget is shown (either initially or because an overlying window has moved away) or updated (for instance, by one of the property setters).
Let's look at the implementation of LED now. The "getter" (a.k.a. accessor) methods are very simple - they just return the value of internal private variables. For instance:
191 bool LED::
192 state() const
193 {
194   return state_;
195 }
The corresponding "setter" methods are (slightly) more interesting:
110 void LED::
111 setState(bool state)
112 {
113   state_ = state;
114   update();
115 }
On line 113 the private variable state_ is set and then on line 114 we make a call to update(). The call results in a QPaintEvent object being put on the Qt event queue. If we didn't call update the state change would not be evident immediately. We would next see it if we caused the LED widget to be hidden and then exposed again. We want to see changes immediately though, so we call update. When the Qt event loop finds this event, it invokes LED::paintEvent (line 143). Line 145 squelches warnings about unused variables.
On line 147 we create a QPainter object. QPainter has many methods for drawing lines, rectangles, text, etc. on QPaintDevice objects, which include QWidget and QPixmap. First, we handle the alignment property which specifies how the LED should fit into the space allocated to it by whatever layout within which the LED widget is contained (lines 149 to 168). On line 170, we define a QRadialGradient, which produces the "reflective" look of the LED widget. On lines 173 to 178, we set the final color of the gradient to black if the state variable is false (off), or to the value of the color property. We then create a QBrush that will be used to fill anything drawn by the QPainter object.
On lines 180 to 183, we finally draw something. The pen is set to the color property's value, we turn anti-aliasing on (to avoid "jaggies"), set the brush to the radial gradient, and draw an ellipse, which is the actual LED. Finally, on lines 185 to 188, we turn on a timer to the flash rate property value if the flash property is true, or we turn off the timer if the flash property is false.
143 paintEvent(QPaintEvent *event)
144 {
145   Q_UNUSED(event);
146
147   QPainter p(this);
148
149   QRect geo = geometry();
150   int width = geo.width();
151   int height = geo.height();
152
153   int x=0, y=0;
154   if ( alignment_ & Qt::AlignLeft )
155       x = 0;
156   else if ( alignment_ & Qt::AlignRight )
157       x = width-diamX_;
158   else if ( alignment_ & Qt::AlignHCenter )
159       x = (width-diamX_)/2;
160   else if ( alignment_ & Qt::AlignJustify )
161       x = 0;
162
163   if ( alignment_ & Qt::AlignTop )
164       y = 0;
165   else if ( alignment_ & Qt::AlignBottom )
166       y = height-diamY_;
167   else if ( alignment_ & Qt::AlignVCenter )
168       y = (height-diamY_)/2;
169
170   QRadialGradient g(x+diamX_/2, y+diamY_/2, diamX_*0.4,
171       diamX_*0.4, diamY_*0.4);
172
173   g.setColorAt(0, Qt::white);
174   if ( state_ )
175       g.setColorAt(1, color_);
176   else
177       g.setColorAt(1, Qt::black);
178   QBrush brush(g);
179
180   p.setPen(color_);
181   p.setRenderHint(QPainter::Antialiasing, true);
182   p.setBrush(brush);
183   p.drawEllipse(x, y, diamX_-1, diamY_-1);
184
185   if ( flashRate_ > 0 && flashing_ )
186       timer_->start(flashRate_);
187   else
188       timer_->stop();
189 }
At this point, we have a useful custom widget. We can insert it into layouts programmatically and we can use promotion in Qt Designer to place LED widgets into designs. The problem with using promotion is that the appearance and behavior of the promoted widget doesn't appear in Designer. We have to actually compile and run our form to see how the LED lays out. So now, we will create a Qt Designer plug-in that will add the LED widget to the Designer palette and allow users to drag and drop it into a design and see how it looks before compiling and running the application. Again, we'll start with the header file:
 4 #include <QDesignerCustomWidgetInterface>
 5
 6 class LEDPlugin : public QObject, public QDesignerCustomWidgetInterface
 7 {
 8   Q_OBJECT
 9   Q_INTERFACES(QDesignerCustomWidgetInterface)
10  #if QT_VERSION >= QT_VERSION_CHECK(5,0,0)
11  Q_PLUGIN_METADATA(IID "com.ics.Qt.CustomWidgets")
12  #endif
13
14 public:
15   LEDPlugin(QObject* parent=0);
16
17   QString name() const;
18   QString group() const;
19   QString toolTip() const;
20   QString whatsThis() const;
21   QString includeFile() const;
22   QIcon icon() const;
23
24   bool isContainer() const;
25
26   QWidget *createWidget(QWidget *parent);
27
28 private:
29   bool initialized;
30 };
On line 6, the LEDPlugin class inherits from QDesignerCustomWidgetInterface. The methods in LEDPlugin are implementations of pure virtual methods in QDesignerCustomWidgetInterface.
The Q_INTERFACES macro on line 9 tells the meta-object system about the interface. On lines 10-12, we see one of the differences from Qt 4 to Qt 5, the use of the new macro Q_PLUGIN_METADATA. This macro allows us to add any sort of metadata we like to an object. In this case, the Qt 5 Designer executable will not load your plug-in unless it sees the IID, a unique identifier for your plug-in. There is an optional FILE parameter that we don't need here. The plugin implementation is almost trivial:
 6 LEDPlugin::
 7 LEDPlugin(QObject* parent) :
 8   QObject(parent),
 9   initialized(false)
10 {
11 }
12
13 QString LEDPlugin::
14 name() const
15 {
16   return "LED";
17 }
18
19 QString LEDPlugin::
20 group() const
21 {
22   return tr("ICS Custom Widgets");
23 }
24
25 QString LEDPlugin::
26 toolTip() const
27 {
28   return tr("An LED");
29 }
30
31 QString LEDPlugin::
32 whatsThis() const
33 {
34   return tr("An LED");
35 }
36
37 QString LEDPlugin::
38 includeFile() const
39 {
40   return "LED.h";
41 }
42
43 QIcon LEDPlugin::
44 icon() const
45 {
46   return QIcon();
47 }
48
49 bool LEDPlugin::
50 isContainer() const
51 {
52   return false;
53 }
54
55 QWidget * LEDPlugin::
56 createWidget(QWidget *parent)
57 {
58   return new LED(parent);
59 }
60
61 #if QT_VERSION < QT_VERSION_CHECK(5,0,0)
62 Q_EXPORT_PLUGIN2(ledplugin, LEDPlugin)
63 #endif
The return values of name(), group() and icon() will appear in the Qt Designer palette while the return of includeFile() is output to the .ui file that Qt Designer generates. The methods toolTip() and whatsThis() define what tool tip and what is this clue will be displayed at run time. Notice that icon() returns an invalid icon. Qt Designer will use a default icon. We return false from isContainer() since LED is not designed to hold other widgets. Qt Designer calls createWidget() to obtain an instance of the LED widget, We simply allocate a new instance on the heap and return it.
Lines 61 to 63 are particularly important. The Q_EXPORT_PLUGIN2 macro ensures that the Qt 4 Designer will see our plug-in. Without this, we will not see the LED widget in the Designer palette. We do not need this macro for Qt 5, the Q_PLUGIN_METADATA macro replaces it.
The last item we need to look at is our qmake file, led-designer-plugin.pro:
 5  greaterThan(QT_MAJOR_VERSION, 4) {
 6    QT += widgets designer
 7  }
 8
 9  lessThan(QT_MAJOR_VERSION, 5) {
10   CONFIG += designer
11 }
12
13 CONFIG += plugin release
14
15 TEMPLATE = lib
16 TARGET = $$qtLibraryTarget($$TARGET)
17 target.path = $$[QT_INSTALL_PLUGINS]/designer
18 INSTALLS += target
19
20 INCLUDEPATH += .
21
22 # Input
23 HEADERS += LED.h LEDPlugin.h
24 SOURCES += LED.cpp LEDPlugin.cpp
In Qt 4, designer needs to be added to the CONFIG variable. In Qt 5, it needs to be added to the QT variable instead. On Linux, you can just run qmake to create a Makefile. When compilation completes do 'make install' to install the LED widget shared library into the default Qt Designer plug-in directory. Designer looks in this directory for any plug-ins and loads them (you may need administrative privileges to install the widget). You can install the plug-in shared library in any directory and define the QT_PLUGIN_PATH environment variable to help Qt Designer find it if you like.
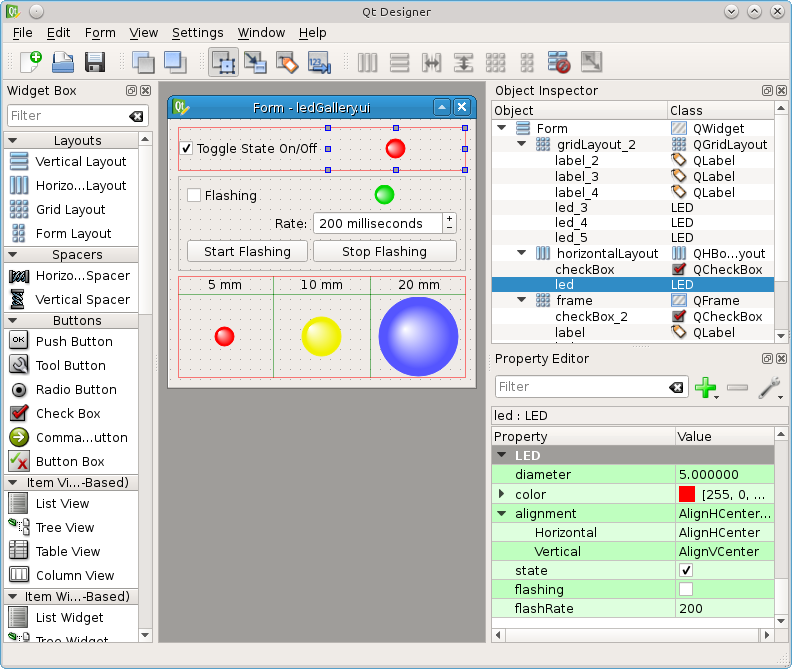
Below is what Qt Designer looks like with the LED widget on its palette. Notice the ICS Custom Widgets group at the bottom of the palette on the left, the selected LED on the widget form, and the property sheet on the right. You can see the properties we defined listed there. You can change any of the properties and see the change in place in Designer.
So there you have it, a simple custom widget added to Qt Designer. If you use a custom widget only once or twice, promotion is a perfectly good way to use it, but if you think a widget will be used many times and potentially by many people, creating a plug-in is certainly a worthwhile use of time and will increase productivity.
You can download the source code via ftp from here.