
Building with Flutter? Discover BLoC Pattern
As developers know, design patterns are crucial to the success of code. If you are a new Flutter developer, you may have encountered patterns such as MVVM. BLoC – or Business Logic Components – is a reactive pattern that separates an application's business logic from its UI logic. The purpose is to make the code easier to maintain and test.
BLoC works based on a library. The BLoC pattern at its core handles asynchronous events and creates a continuous flow with a reactive programming approach. Reactive programming refers to a design paradigm that relies on asynchronous programming logic to handle real-time updates to otherwise static content. By using this structure, it is possible to insert a number of events into the process to obtain an intended result. Since this is treated as a flow, the UI will always stay up to date. This is the basic logic of BLoC.
A Closer Look at Reactive Programming
Reactive programming differs from traditional, event-oriented programming. The first is data-driven while the latter is process-oriented. In traditional programming, the general steps are as follows:
- Relevant code is developed
- Code is compiled
- Compiled code is run step by step
- Results occur
This approach has a number of advantages:
- With traditional programming methods, the basic building blocks of the program and the operating logic are easy to understand, making it easier to learn and use.
- Since traditional programming languages and methods have a long history and a large user community, many resources and help are available.
Of course, this approach also has some limitations. For instance, if there is a parameter or data that the developer wants to include in the process at different points in the application, doing so generally requires using a two-step approach, which can be cumbersome. It looks like this:
- The application is blocked and the process is taken to the beginning.
- By using a callback, the desired data is added to the data in the memory and the process is run from the beginning with the newly formed cluster.
To ease such situations, reactive understanding has been included in this process with the intent of more effectively maintaining the code.
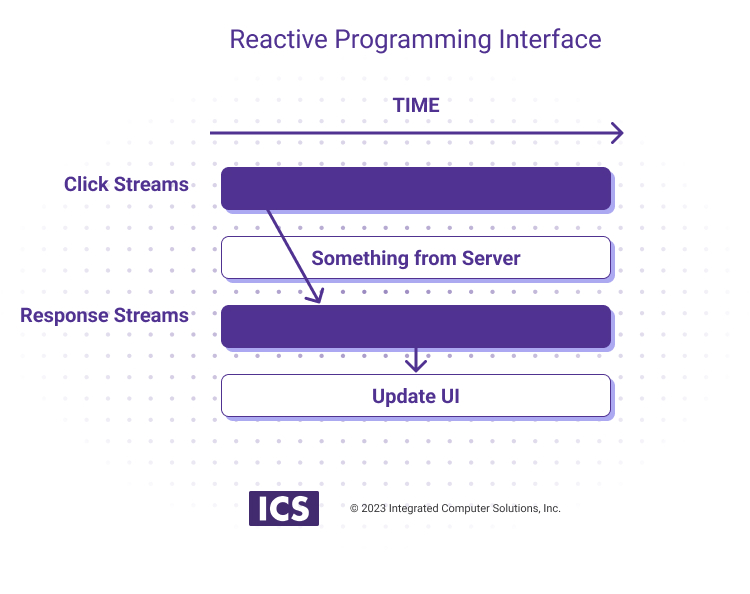
In the reactive programming approach, the situation operates as follows: If the developer wants to add to the existing data of the running application at any time, reactive programming will run this process asynchronously without disturbing the continuity of the application. The process is depicted in Figure 1.
Benefits of the BLoC Pattern
The BloC pattern is a popular state management pattern for applications, and using it can offer several notable benefits:
Separation of concern: The BloC pattern separates the business logic of your app from the UI, which makes your code more organized and easier to maintain.
Reusability: The BloC pattern allows you to reuse the same logic across multiple screens, which reduces code duplication and saves time.
Testability: The BloC pattern makes it easier to test your app because the business logic is separated from the UI. This means you can write unit tests for the logic without worrying about the UI.
Scalability: The BloC pattern can help you build scalable apps because it allows you to manage complex application state in a predictable and efficient way.
Basic Logic of BLoC
BLoC is a state management solution that employs the concept of reactive programming. It is built on top of Streams, which can be described as any event or action included in the application. As a result, output may encompass complete data or errors. Streams form the basis of the BLoC structure. Another important concept is that of a Future.
Future: This refers to any incomplete computation. For example, there may be a transaction that has not been completed yet and we do not know when it will be completed. All we know is that the operation will complete at some point and we will have a State as a result of this operation.
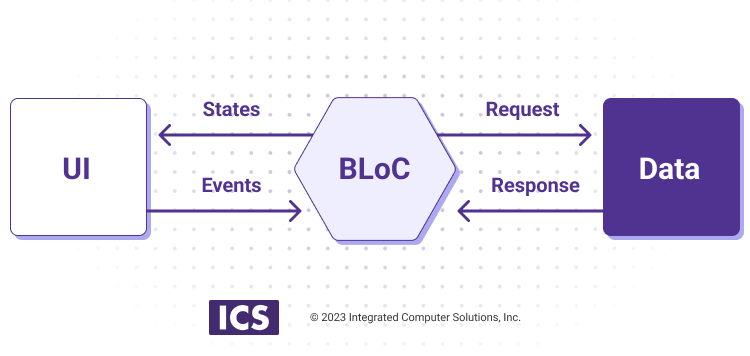
Stream: When you have more than one workflow (Future) for which the completion time is unknown, you have a structure. This is shown in Figure 2. The section where the business logic will be installed in the application is the bloc section in the center of the diagram. This bloc generates state according to the events it will contain. These events can be anything. For example, the username and password parameters on the login page.
Cubit: The designers of the BLoC package also introduced a structure called Cubit due to the complexity in the BLoC structure. Although the working principles are the same, there are also some differences.

As you can see in Figure 3, the section that has events in the BLoC structure is Functions in Cubit. In these triggered functions, the Cubit structure will create a state. The working principles of BLoC and Cubit are the same; the methods and techniques used are different.
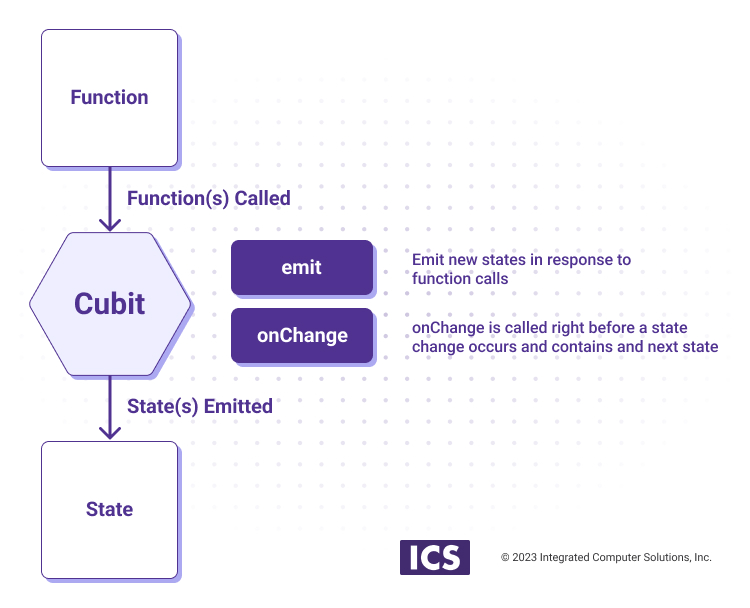
In the Cubit structure shown below in Figure 4, you can see that the arrival of an event triggered by a new function in turn triggers the structure emit functions. This will create a new state. It also determines which state of continuously triggered events will be updated by creating an onChange structure. Here’s what that would look like:
The CounterCubit class is a general example of a class used when describing the BLoC architecture. With this general definition class, we can examine how functions and states are defined with Cubit. When the functions (increment and decrease) shown in Figure 4 are called, this is an example of how the called arc changes state.
The code below is a generic CounterCubit class that keeps its state in Cubit:
/// A `CounterCubit` which manages an `int` as its state.
class CounterCubit extends Cubit<int> {
 /// The initial state of the `CounterCubit` is 0.
 CounterCubit() : super(0);

 /// When increment is called, the current state
 /// of the cubit is accessed via `state` and
 /// a new `state` is emitted via `emit`.
 void increment() => emit(state + 1);
 void decrement() => emit(state - 1);
}
Cubit indicates that it will work with integer data with Cubit<int> and super(0) indicates that the initial value is 0. There is also an increment() function under the CounterCubit() class. When this function is triggered, it emits 1 more than the existing state emit(state + 1). If state is 0, the new state will be 1.
In the code above, state is kept directly in the cubit class. The following code example can be used to separate the state:
class CounterState {
 final int count;

 CounterState(required this.count);
}
import 'package:flutter_bloc/flutter_bloc.dart';

class CounterCubit extends Cubit<CounterState> {
 CounterCubit() : super(CounterState(0));

 void increment() {
   emit(CounterState(state.count + 1));
 }

 void decrement() {
   emit(CounterState(state.count - 1));
 }
}
Summary
In this blog I touched on the differences between reactive programming and traditional programming, and explained how BLoC provides the reactive programming architecture. In part 2 of this blog series, I’ll take a deeper dive into the BLoC pattern, giving you a look at a variety of helpful widgets, such as BlocProvider, BlocBuilder and BLocListener.