
How to Create a Qt/CMake Project that Easily Supports Unit Testing
Unit testing is becoming an essential part of the software implementation process. Test-driven Development (TDD), for instance, mandates that before a requirement is even implemented a corresponding test case must be written.
In the context of Graphic User Interfaces (GUI), developers are often confronted with having to write unit tests for what is typically validated by a human’s perception of the software’s look and feel. The Qt Test Module provides some tools that can facilitate this task.
Using this module and illustrating it with a fun example hosted here, this blog describes how to create a Qt/CMake project that easily supports Unit Testing.
Creating a Unit Testing Project Infrastructure
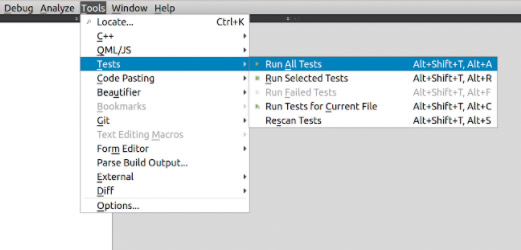
The CMake build tool provides the program CTest as a means for unit testing. If the project is configured correctly, it’s invocation will trigger the running of all the project’s unit tests. It can be called from the command line of the project’s build directory or from Qt Creator under the “Tools” menu.
To enable this, the project’s main CMakeLists.txt file must contain the following directive: enable_testing().
The project’s unit tests are contained within CMake sub-projects that are implemented using the Qt Test Module. There are two types of these sub-projects: the ones that test the application’s business logic using Qt Test; and the ones that test the application’s user interface using Qt Quick Test.
In our example, the first is illustrated with the BusinessLogicTest project, the second with the GUIQMLScreenTest project. For CTest to run these tests, the CMakeLists.txt file of both sub-projects uses the directive add_test.
Here's a Fun Example
Our example is inspired by this YouTube math video that attempts to visually prove a property of the Fibonacci sequence. Our project creates a program that draws the visual squares the presenter uses. Each click of the mouse will trigger the creation of the square whose area represents the current Fibonacci number.
For instance, if the user starts the application and then clicks eight times, the program should display this:
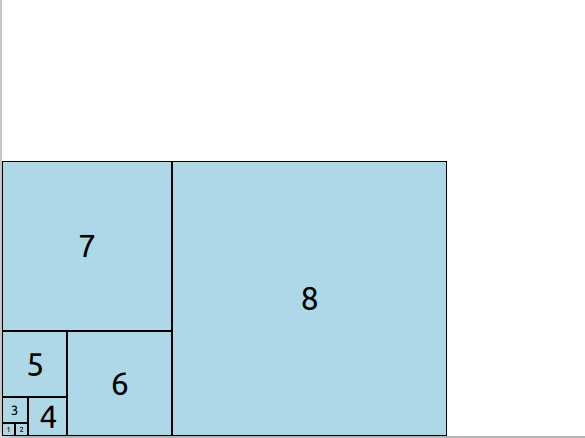
In our example hosted here, the binary of the application that achieves this is created by the subproject FibonacciPgm.
Testing Business Logic
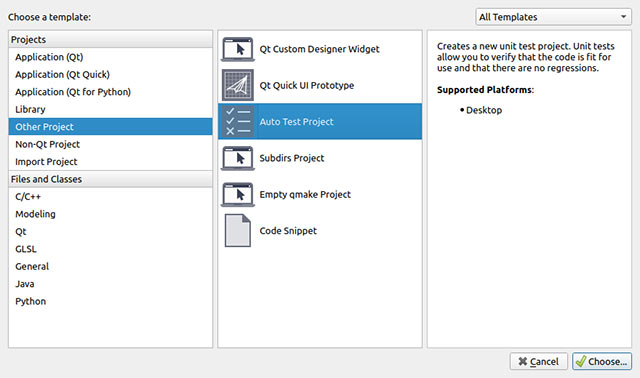
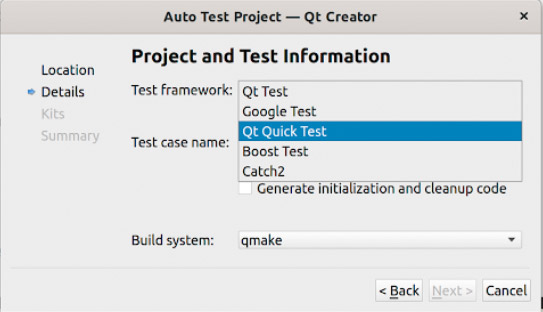
The project encapsulates the business logic in its own library. In our fun example, the business logic is generated by the sub-project BusinessLogic. Both the application and the BusinessLogicTest link to it. This separation alleviates one of the main challenges in writing unit tests: making our project testable. Although the BusinessLogicTest uses the Qt Test framework, others could have been considered. For instance, the Qt Creator wizard generating unit tests also allows the usage of Google Test, Boost Test and Catch 2. To invoke these wizards in Qt Creator, select New, Other Projects and then Auto Test Project.
It is this wizard that generated the skeleton for the BusinessLogicTest project consisting of one cpp and CMakeLists.txt file. The sole cpp file contains a QObject class whose slots are in fact the unit tests.
It our example we leveraged the data driven testing feature of the Qt Test framework which encapsulates the input and expected output data in a table like this:
void testFibonacci::testcase_data()
{
   QTest::addColumn<uint>("input");
   QTest::addColumn<uint>("expectedresult");
   QTest::newRow("Fib 0") << uint(0) << uint(0);
   QTest::newRow("Fib 1") << uint(1) << uint(1);
   QTest::newRow("Fib 2") << uint(2) << uint(1);
   QTest::newRow("Fib 5") << uint(5) << uint(5) ;
   QTest::newRow("Fib 23") << uint(23) << uint(28657);
   QTest::newRow("Fib 50") << uint(50) << uint(12586269025);
}

void testFibonacci::testcase()
{
   QFETCH(uint, input);
   QFETCH(uint, expectedresult);
   uint actualresult;
   QBENCHMARK {
       actualresult = m_businessLogic->fib(input);
   }
   QCOMPARE(actualresult, expectedresult);
}
Our BusinessLogicTest runs six unit tests (the number of rows in the table) and tests the business logic’s implementation of the Fibonacci function: uint BusinessLogic::fib(uint n) noexcept.
The QCOMPARE macro will compare the actual result of this function with its expected result and will log the result. The QBENCHARK macro provides a time-performance measurement of the function it wraps.
Testing GUI
In our example, the sub-project GUIQMLScreenTest tests the user interface. It was also generated using the Qt Creator wizard. However, when it came to picking the testing framework, the Qt Quick Test option was selected.
This generates a boilerplate main.cpp that instantiates all qml files whose names start with the prefix tst_. These files are QML TestCase objects whose JavaScript functions are the unit tests.
The TestCase type provides the compare and verify functions that log a success or fail on a particular test. It also provides functions that simulate GUI events such as mouse presses and gestures.
In our fun example, we tested the size of the font of the squares like this:
TestCase {

property Fibrect fibrect: null
   Component {
       Id: factory
       Fibrect {
       }
   }

 function init()
   {
       fibrect = factory.createObject(parent)
   }

   function test_smallfont()
   {
       // Prepare
       fibrect.width = 20
       compare(10, fibrect.textLabel.font.pixelSize)
   }

   function test_bigfont()
   {
       // Prepare
       fibrect.width = 120
       compare(32, fibrect.textLabel.font.pixelSize)
   }
}
When a QML TestCase is instantiated, all javascript functions whose name starts with the prefix tst_ run in alphabetical order. Between each of them, the function init() and cleanup() are called. Notice that these functions respectively instantiate and destroy the QML object we want to test by leveraging the QML Component object. The unit tests examine the properties the object under test exposes. Making a Qt Quick application testable will often require the user to expose object properties that would otherwise be hidden.
Because the user interface is independently tested from the C++ business logic, the latter is mocked in QML in the MockBusinessLogic.qml file like this:
QtObject {
   function fib(a)
   {
       return 1
   }
}
To properly mock a QObject from the business logic, we ensure that the corresponding QML object contains the same functions and has the same QML ID. The file tst_GUI does that like this: property MockBusinessLogic business : MockBusinessLogic{}.
Beyond comparing the individual properties of the QML objects under test, it is possible to do screenshot comparisons using the TestCase::grabImage function. The challenge with pixel and geometry testing however is when something minor changes, huge swaths of tests will need to be updated. This entry in Qt bug database https://bugreports.qt.io/browse/QTBUG-67221 also suggests that usage of this function is for now limited.
The Result
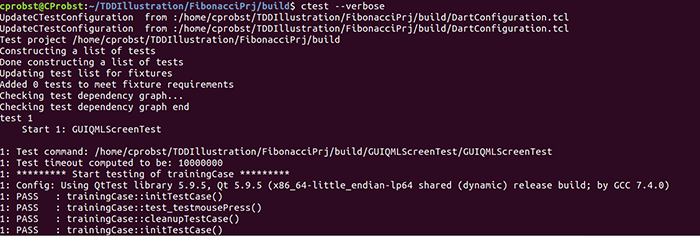
Once this is all set up, the invocation of CTest on the command line should produce this kind of a result:

A more verbose output can be achieved adding the --verbose option ctest like this:
Conclusion
Our example is a fun way to showcase the set of tools that can assist the developer in unit testing a Qt/QML application. Keep in mind that most often the implementation of a software feature is just as involved as its corresponding unit test. The trade-off however is that with unit tests, software regressions are less likely. For a more in-depth review of this topic, please take a look at this webinar on the Qt test framework.