
How to Put a Yocto Build Under Continuous Integration in the Cloud
Continuous Integration has become standard practice in software development. Yocto is used in almost all embedded devices that run Linux, but is time consuming to work with. It can take many hours to do a complete Yocto build from scratch, so at first glance it seems infeasible to do a build each time a developer pushes code to a git repository. However, Yocto has some features that can speed up the process quite a bit. This article describes how to go about putting a time- (and space) consuming Yocto build under continuous integration. There is a short glossary of terms at the end.
Get Yocto Build Running Locally
The first step is to get your Yocto build to finish successfully on a local machine (either real or virtual). I tend to run Ubuntu inside VirtualBox running on Windows. Running a full Yocto build from scratch can take many hours, so I recommend running overnight. For this article, we'll be using a Dunfell version of Yocto for Variscite boards. The Yocto build completes when it populates the build/tmp/deploy/images/var-som-mx6 folder with a rootfs.wic.gz file (the SD card image).
Once you get your first "long" i.e. from scratch Yocto build to complete, you can reuse the downloads and sstate-cache folders that it generated to speed up future builds (sometimes called "incremental" or "short" builds). You can copy downloads and sstate-cache to another location (e.g. ~ or /mnt/resource), delete the var-fslc-yocto folder, and start over but append e.g. the following lines to build/conf/local.conf:
INHERIT += "rm_work"
DL_DIR = "/mnt/resource/downloads"
SSTATE_DIR = "/mnt/resource/sstate-cache"
rm_work drastically reduces the storage space used while downloads and sstate-cache drastically reduce the build time, usually to under 30 minutes i.e. something that is acceptable for continuous integration. More CPU cores reduce the build time further.
Select Cloud Virtual Machine
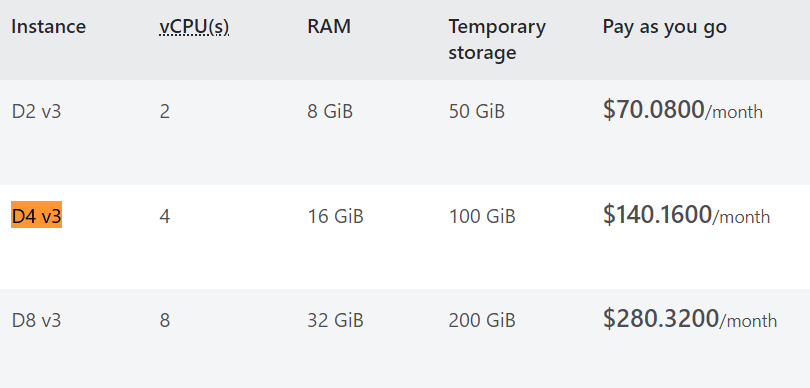
Once you can get a Yocto build to successfully complete locally, it's time to select a virtual machine in the cloud and reproduce the build there. Cloud virtual machines cost money every month, and more powerful machines are more expensive, so the trick is to find a machine that is powerful enough to run the build quickly but without costing too much. Both Amazon Web Services (AWS) and Microsoft Azure machines are popular. I chose an Azure Standard D4 v3 machine with four cores, 16 GB of RAM, and 100 GB of storage.
For a small team of developers, I've found that it's best to run two virtual machines so that two builds can run in parallel (large teams may require more). The second machine not only increases responsiveness of the continuous integration, but also provides redundancy in case one machine needs to be brought down for maintenance.
Select Version Control
Now that you can get your Yocto build to complete on a cloud virtual machine, it's time to select the place where the git repositories specific to your project will live. Some popular ones are GitHub, GitLab, Bitbucket, and Azure DevOps. Azure DevOps is my favorite, but GitHub is probably the most popular, so we'll use it here. GitHub's build pipelines are called Actions (or Workflows). Below is our YAML workflow for our Yocto build (i.e. the file .github/workflows/main.yml stored in our git repository).
name: build

on: # Controls when the workflow will run
  push: # Triggers the workflow on push events but only for the develop or main branches
    branches: [develop, main]
  pull_request:
  workflow_dispatch: # Allows you to run this workflow manually from the Actions tab

jobs: # A workflow run is made up of one or more jobs that can run sequentially or in parallel
  build: # This workflow contains a single job called "build"
    runs-on: [self-hosted, Linux, X64, BuildMachine] # The type of runner that the job will run on

    steps: # Steps represent a sequence of tasks that will be executed as part of the job
      - run: rm -rf var-fslc-yocto # clean

      - run: |
          mkdir var-fslc-yocto
          cd var-fslc-yocto
          repo init -u https://github.com/varigit/variscite-bsp-platform.git -b 05082844a2bf88295974f89a56daa9389ec5e10a
          repo sync

          export EULA=1
          MACHINE=var-som-mx6 DISTRO=fslc-framebuffer source setup-environment build

          echo 'INHERIT += "rm_work"'                      >> conf/local.conf
          echo 'DL_DIR = "/mnt/resource/downloads"'        >> conf/local.conf
          echo 'SSTATE_DIR = "/mnt/resource/sstate-cache"' >> conf/local.conf

          bitbake fsl-image-gui

      - uses: actions/upload-artifact@v2
        with:
          name: sdcard
          path: var-fslc-yocto/build/tmp/deploy/images/var-som-mx6/*.rootfs.wic.gz

      - run: rm -rf var-fslc-yocto # clean
As of this writing:
A. The latest dunfell branch (-b dunfell) was broken i.e. didn't build so instead I used a hash to choose an earlier commit that works: 05082844a2bf88295974f89a56daa9389ec5e10a.
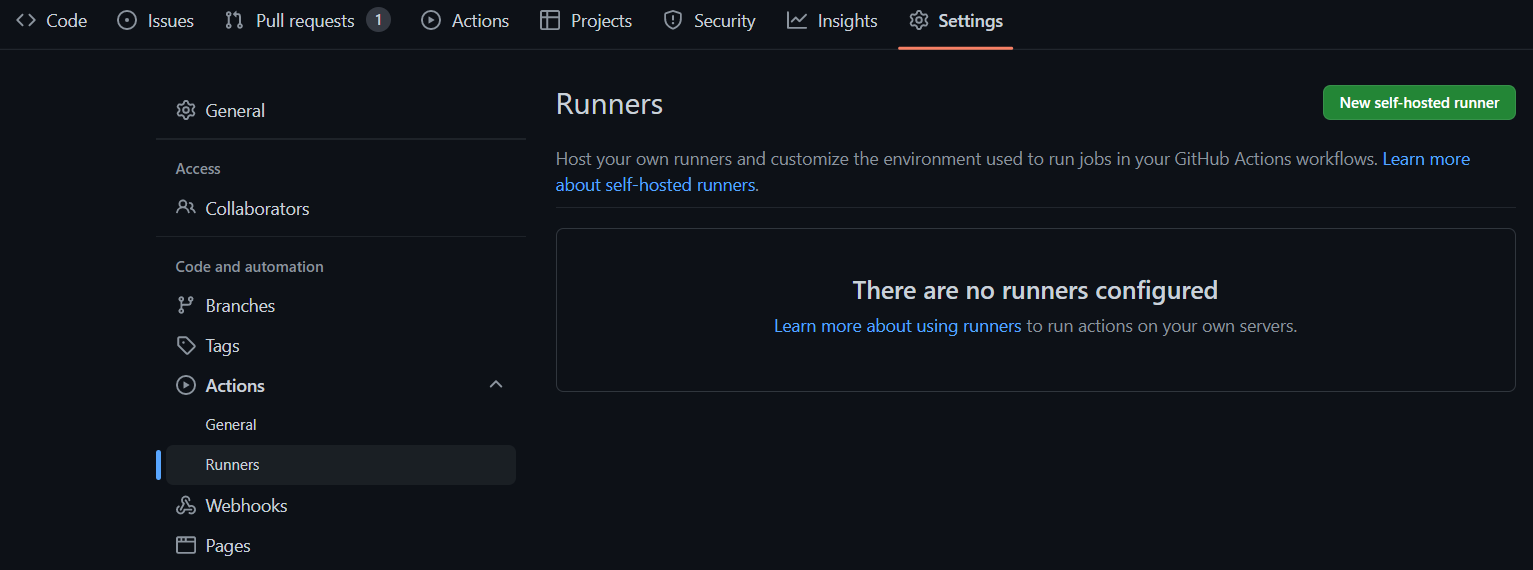
B. You must use a self-hosted runner to perform a Yocto build. GitHub-hosted runners do not have enough storage to perform a Yocto build even with rm_work. In GitHub, select Settings > Actions > Runners > New self-hosted runner.
You'll need one YAML workflow like above for each actively developed repository. Each repository's YAML workflow needs to be slightly different to handle branches (since developers typically do their work in a branch before creating a pull request). There are three places in the above YAML we'd want to do this:
1. For branches in the variscite-bsp-platform (manifest) repository, the repo init line can be changed to the following to bring in the developer's branch i.e. the GitHub variables will be replaced with the branch name:
repo init -u https://github.com/varigit/variscite-bsp-platform.git -b ${GITHUB_HEAD_REF:-${GITHUB_REF#refs/heads/}}2. For branches in one of the meta repositories, a sed command can be inserted just before repo sync to replace the revision in .repo/manifests/default.xml with the branch name ${GITHUB_HEAD_REF:-${GITHUB_REF#refs/heads/}}. For example:
sed -i '/meta-variscite-fslc/c\ <project remote="variscite" revision="'${GITHUB_HEAD_REF:-${GITHUB_REF#refs/heads/}}'" upstream="dunfell" name="meta-variscite-fslc" path="sources/meta-variscite-fslc"/>' .repo/manifests/default.xml

repo sync
3. For branches in any other repository (referenced in a .bb file), a sed command can be inserted just after repo sync to replace the branch name in the .bb file with ${GITHUB_HEAD_REF:-${GITHUB_REF#refs/heads/}}. For example:
repo sync

sed -i '/^SRCBRANCH/c\SRCBRANCH="'${GITHUB_HEAD_REF:-${GITHUB_REF#refs/heads/}}'"' sources/meta-variscite-fslc/recipes-extended/jailhouse/jailhouse_0.12.bb
Maintenance
The downloads and especially sstate-cache folders tend to slowly grow over time and will eventually exhaust the space on the virtual machine. In this case, builds will fail and human intervention is required to take the machine down for maintenance, delete the downloads and/or sstate-cache folder(s), and run a yocto build from scratch to recreate downloads and/or sstate-cache.
Glossary
continuous integration: the process of automatically running compilers, static code analysis, style checkers, and other tools on a build server each time a developer pushes changes to ensure code quality.
downloads: Yocto's folder for storing source code downloaded from remote repositories. Reusing downloads speeds up the build and prevents the build server from having to make network requests to fetch source code.
manifest: a small repository containing a single file called default.xml, which is the input to Google's repo tool.
meta: a Yocto "layer" containing recipes (.bb files).
repo: Google's command line tool for managing multiple invocations of "git clone", using default.xml as input. Most Yocto builds use repo to download the meta repositories necessary to bootstrap the build.
rm_work: a space-saving Yocto directive in local.conf that instructs Yocto to delete intermediate files in the build/tmp/work folder after they are no longer needed.
sed: a standard Unix/Linux command line tool that has been around for decades and is extremely useful for putting Yocto builds under continuous integration by performing simple text replacements.
sstate-cache: Yocto's folder for storing a cache to speed up the build process. Reusing sstate-cache drastically speeds up the build.
Yocto: The Yocto Project is a system for building a custom Linux-based operating system from thousands of source code repositories.