Smarter EEPROM Programming with the Raspberry Pi Pico 2W
Some carrier boards used with System-on-Modules (SoMs) include an onboard EEPROM (electrically erasable programmable read-only memory) that helps the bootloader identify the correct device tree to load. The catch? That EEPROM often needs to be programmed before the board can even boot, creating a classic chicken-and-egg problem.
In this post, I’ll walk through how I solved this using a low-cost Raspberry Pi Pico 2W as an I²C EEPROM programmer, with a little help from AI to speed things up.
Two Ways to Flash the EEPROM (and Why One Is Safer)
I always recommend that clients include an EEPROM on their custom carrier boards. It’s the cleanest way to let the bootloader automatically detect which board and revision it’s running on. That makes future hardware revisions easier to manage, without having to juggle multiple software stacks or repurpose precious GPIOs as board IDs.
Of course, this brings up the question of how to flash the EEPROM. There are two options: you can either do it from within the OS (after manually forcing the right device tree) or program it externally before first boot.
The former is tedious because it requires manual steps or installer software built for a specific carrier board version. And it’s error-prone, which I learned the hard way when I accidentally overwrote an EEPROM with the wrong board ID. While testing a Variscite VAR-SOM-MX8M-Mini software stack on my Symphony carrier board, I completely forgot that the installer was hardcoded to push another board’s ID to the EEPROM.
The result wasn’t pretty.
So in this post, I’ll show you the latter approach: how to program an I²C EEPROM before first boot, using only a Pico 2W, a few jumper wires and a clever setup.
Building a Simple EEPROM Programmer with the Raspberry Pi Pico 2W
An I²C EEPROM requires:
Power in the form of VCC (3.3V) and ground
A connection for the I²C SDA line
A connection for the I²C SCL line
The Pico 2W can easily supply all of them. In my case, I used pin 37 as VCC to power the EEPROM, pin 38 as GND, and pins 6 and 7 as SDA and SCL respectively.
The USB-powered Raspberry Pi can easily provide the necessary power to the EEPROM. So, we need software for it. While I feel quite comfortable writing C/C++ code I have never used this RPi device before. I could put my nose deep into manuals and SDK documentation, but I wanted to speed things along. So I turned to AI for a shortcut.
I asked Claude to write a C++ program compiled using CMake for the Raspberry Pi Pico 2W using the device's SDK. Specifically, I told Claude the application should:
Connect to a WiFi network "hermione" with pass "Thisisatest"
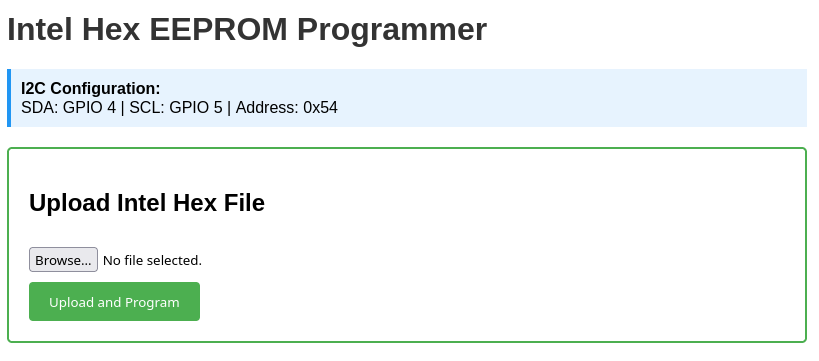
Provide a web page on which a user can upload an Intel Hex file
The code then writes the intel hex values into an EEPROM using the I²C pins 6 (I2C0_SDA) and 7 (I2C0_SCL) of the device
The AI got most of the concepts right on the first try, but there were a few quirks. On the plus side, it correctly implemented an Intel HEX parser, defining a proper struct and using uint16_t for the address field.
But…
It confused pins with GPIO numbers, so the initial code referenced GPIOs 6 and 7 instead of the physical pins 6 and 7
It omitted the lwiopts.h header
It assumed two-byte addressing for the memory, which doesn’t apply in our case
It skipped checksum validation for each line of the Intel HEX file, though in Claude’s defense I hadn’t explicitly requested that
In retrospect, I should have probably given Claude more context, like the correct memory part number.
Still this was a valuable output.
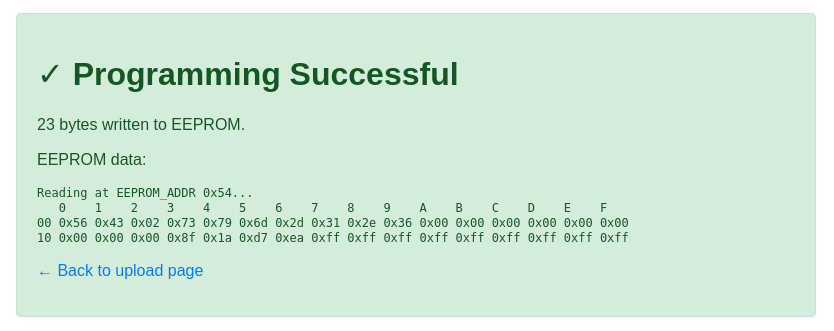
I ended up connecting my digital analyzer to the boards and debugging them (learning a lot about the RPi Pico 2’s SDK in the process). I also added some extra code to locate devices’ addresses within the bus and read the EEPROM before and after writing to it, although this information is shown via the USB serial interface of the Pico 2W.
Here is a screenshot of the welcome web page:
And the web page confirming the write:
The final code can be found here. Don’t forget to read the README.md file!
The Takeaway: Writing an EEPROM is Easy
Programming an I²C EEPROM before first boot doesn’t have to involve expensive tools or cumbersome workflows. With a Raspberry Pi Pico 2W, some basic wiring and a bit of AI-assisted coding (thanks, Claude!), you can build a lightweight solution that future-proofs your carrier boards.
Beyond saving time, this approach gives you full control over your hardware initialization process — no risky first boots, no manual board-ID mistakes and no dependency on specialized production setups. I’ve discovered that sometimes the simplest tools and a little ingenuity go a long way to solve even the trickiest development problems.
If you enjoyed this blog, I invite you to read some of my other content such as Implement Secure Boot and Filesystem Encryption in Embedded Systems.